Managed Metadata gives organizations
the capability of using a common terminology across the enterprise. When
properly utilized, Managed Metadata will contain the language a company
speaks. There are many terms that refer to a base term and Managed
Metadata does the work of standardizing the "slang" of a company.
An example of this is the term North America. It is
referred to as NA, United States, or Canada. Set up properly, the base
term can be NA, but any of the aforementioned terms can be put in by the
user.
All of this data is saved in what is called a Term
Store. The Term Store as we have seen in previous recipes is a
repository where that data is stored and configured.
In order for users to leverage this data, it must be
input somewhere at the site level as a function of metadata. This is
done via content types, document libraries, and lists.
This recipe will show how to add a managed metadata column in a list.
Getting ready
User must have designer rights to a site. The Managed
metadata service for Finance should be configured as described in
previous recipes.
How to do it...
Navigate to a site with the team site template implemented.
In the Quick Launch (left-hand side vertical navigation) area, click Tasks.
At the top is the menu item called List Tools.

Click List.
The ribbon appears and is lit up. At the far right end of the ribbon is a button called List Settings; click on that button.
The list information appears. Under the section named Columns, click Create Column.
A form appears with radio buttons for the different types of data. At the bottom of the named types is the radio button named Managed Metadata; select that button.
There are seven sections to the adjusted form. Enter the Column name as Financial Term.
The second section is Additional Column Settings; leave it as is.
Section three, Multiple Value field, allows for multiple values in a column. Do not check the box.
Section four is about how to display the value from the term set. There is a radio button named Display term label in the field; make sure it is selected.
In the section number five, we pick the value from the term set. Enter ebi into the text box under the Use a managed term set option and click the binoculars icon. You should see the following screenshot:
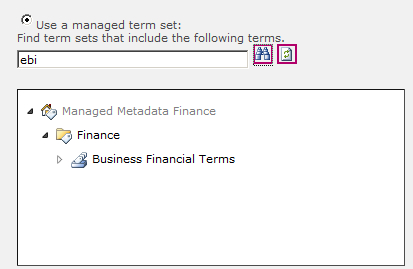
Click Business Financial Terms and then click OK at the bottom of the form.
How it works...
Business Financial Terms is the Term Set being
employed with this column we called Financial Term. We have assigned
this column to the list called Tasks. Any time a task is entered, a
financial term can be associated with this task.
In the example that we have shown, we are consuming the Managed Metadata Finance Service Application. The screenshot shows ebi,
but with the type-ahead functionality, EBITDA will be populated. We can
add other financial terms such as assets, cashflow, cost of sales, and
so on. As long as they are in the term set, every task can be related to
one of these terms.
Across an enterprise organization, a controller can find all of the tasks that are directly related to finance.
There's more...
When a task is being entered, and one of the fields
is of the type Managed Metadata, there is a "type-ahead suggestions"
service available as we saw in the last recipe. Included in the
suggestions are synonyms that have been defined in the Term Store.
This feature helps companies standardize the language
of their business. Consider a small example. Regions is a popular
metadata term. Large international companies have regions set up to fit
their businesses. For one company, the North America region may consist
of the United States, Canada, and Mexico, whereas for some other, the
North America region might constitute United States and Canada.
By correctly setting up the metadata in the Term
Store, a user only has to type in Mexico and the region will be
automatically populated. The following screenshot shows the same concept
with EBITDA.
